Posted tagged ‘reflective’

Special edition catalogues – in collaboration with Susan Mortimer

June 29, 2010

Some weeks ago I randomly got into conversation with fellow final yr (online) student Susan Mortimer who, as mentioned in a previous post, puts together and hand makes the Mail Art One zine. Susan also makes one-off special edition books/catalogues showcasing work by solo artists. So I suggested that it would be really cool if we one day used my mirror card cut-outs as covers for special edition books featuring some of my work from the MA.

And lovely and kind as Susan is, she said why not?, let’s do it now (instead of some time in the future which is what I was thinking). Obviously I was going to jump at the chance and thought wow if she’s willing to try it then I am soo game and therefore I set about ordering specific double-sided mirror card for this mini project.

Black and white versions of special edition books - collaboration: Sara Choudhrey and Susan Mortimer

Black and white versions of special edition books - collaboration: Hand-cut covers by Sara Choudhrey and printing and binding by Susan Mortimer

The books are a mini showcase of some of the images from my experimentation through the MA project so far. I chose 10 images which I think some of the key visual elements of my work and added a few coloured samples to give some variation to the black and white theme. I think they work well together in the book and I asked Susan to arrange an order that she thought would suit them best (it’s hard to see your work objectively when you’ve been concentrating on it for so long). She did a great job.

Browsing through the book

Browsing through the book

I hand-cut a few of the sheets using pat7 (the pattern used for all aspects of the final piece) and arranged it so that the 10-point star would be in the middle of the front and the back.

White version with full front and back cutting

White version with full front and back cutting

Black version with half cut cover

Black version with half-cut cover

I slightly altered the symmetry towards the spine too to make it fit appropriately. These sheets were then sent to Susan so she could test the binding and this morning I had the pleasure of receiving the proofs to look at.

Black and white versions of the books

Black and white versions of the books

I actually can’t decide which one I like best. We originally had the black one all black (even the middle section with the star in black too), but then this evening I thought I’d see how it looked with that cut out too and I quite liked it. And this is something I can do once Susan has finished the printing and binding on her side.

Susan has posted about her side of the process here: http://susanmort.wordpress.com/2010/06/26/u2-collaboration-with-sara/

Images of the books taken by Susan - capturing the shadows and reflections produced by the double-sided mirror card cut-out

Images of the books taken by Susan - capturing the shadows and reflections produced by the double-sided mirror card cut-out

We’ve just got a few more tweaks to do and then I’ll have around 20 of these special editions. I’m even contemplating having a couple on a plinth in the light room of the MADA (MA Digital Arts) exhibition space, but I’m going to leave this as an option if time permits rather than a must. Also, need to ask the others if there is space for it …

I now just need to get on with cutting the rest of the 20 covers! I may need a two-week long hand massage once I’m done.

Reflective light projection

October 25, 2009

I wonder if the title depicts what I actually mean by it. Well images are always useful in these circumstances. I’ve been to the art shop recently and, as mentioned in a recent previous post, I decided to pursue the idea of using reflections. I found some reflective sheets of card (quite large A1 size) and had one placed on a box in my room lying flat but parallel to the wall. The light in my room was hitting off of the sheet and this was bounced/reflected on to the wall where it was casting some oddly shaped lines.

I then placed a cut-out pattern directly on to the reflective card – that was a good move. The card was slightly curved and as a result the light and pattern was also curved in its projective state on the wall.

Light reflected from card on to wall

Light reflected from card on to wall

I moved the sheet slightly higher and deepened the curve and the results changed too:

Twisted projection of pattern with reflected light

Twisted projection of pattern with reflected light

I was pleased to see how the small changes in the curves and placement of the card could create many variations of patterned shapes. This led to another few sample work ideas for installation pieces. These would probably be stand alone pieces as part of the wider range of work presented.

I then pulled some of the above photos in to Photoshop and experimented with colouring and was able to produce a hightened contrast by darkening the images and layering and rotating them. The light stands out better here and looks like a hologram or a laser display:

Digitally manipulated image from reflective light series

Digitally manipulated image from reflective light series

General Update on activities:
I have also been able to find some 3D geometric template sheets online to cut out and assemble. These are small and tricky to stick together but I managed to get them to hold for a few seconds while I took a couple of images. The really hard part will be figuring out how to apply a pattern to these shapes that has a similar underlying grid to the shapes they are made up from. For example for a dodecahedron there will need to be a construction with a pentagon tiling and for the icosahedron an equilateral triangle.

Flat template of for making a dodecahedron - printed from http://www.mathsisfun.com/geometry/dodecahedron-model.html

Flat template of for making a dodecahedron - printed from http://www.mathsisfun.com/geometry/dodecahedron-model.html

Dodecahedron

Dodecahedron

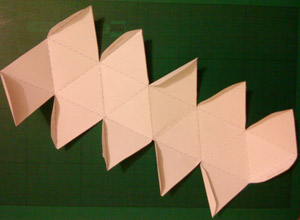
An icosahedron prior to assembly - printed from http://www.mathsisfun.com/geometry/icosahedron-model.html

An icosahedron prior to assembly - printed from http://www.mathsisfun.com/geometry/icosahedron-model.html

Icosahedron - just before it fell apart

Icosahedron - just before it fell apart

I may need to create a large-scale pattern on a large flat sheet first and then outline the template to cut out from this with correct placement and hope it sticks together right. In practice I will probably get it all wrong – still, no harm in trying.

Pattern-making workshop
I’ve joint a 10-week workshop where we are creating traditional Islamic patterns being taught by Richard Henry. He teaches with Birkbeck as well as with schools and also creates artwork himself. He was also taught by Keith Critchlow so I think we’re in good hands!

Richard’s worksheets are very easy to follow and start from basic circle formations to developing full pattern constructions. Some of the patterns are similar to those I’ve done already but Richard’s approach to constructing them seem easier and sometimes more practical. I wanted to take the class to see how things could be done perhaps with short-cuts or to make some of the stages quicker with ‘best-practice’. Many a handy tips have been passed on already. It has also affirmed some of the general things I’ve picked up about pattern-making and the things I need to be aware of (for example I thought it was just me when my compass would slightly alter itself). All in all I’m really enjoying it.

To have a look at some of Richard Henry’s work visit his web site: http://www.richardhenry.info/

Tutorial – notes and ideas stemmed

June 8, 2009

Date of tutorial: 03/06/09

Tutor: Jonathan Kearney

It’s been a while since my last tutorial so it’s interesting to see my blog posts being looked at from the perspective of someone who visits after a while and basically catches up with what I’ve been doing.

Jonathan asked about my recent activities and I gave him an overall summary similar to the update in my previous post. He then asked me about various subjects such as Arabic calligraphy and whether this can be used in m project. Something you may be aware I have considered a while back. He suggested I experiment even if it doesn’t go to plan. At least that way I can learn from the experience and progress through it knowing I gave it a shot. I guess by giving all your ideas a chance to formulate and be tried out means there’s less chance of regret later.

Jonathan also reminded me to check out his write-up on the uni wiki about reflective blog writing and showed me some of the bullet points that would be good for me to use in assessing my older posts. The intention would be for me to question myself about how/what I was thinking at the time of writing the post and compare that to how/what I’m thinking/feeling now. Have I changed my views on certain subjects? Do I feel the same about them?

We also discussed the requirements for the essay which although not due till September is still something I need to start focussing on. It’s a 5,000 word essay about contextualising my project. I think I had difficulty in understanding what exactly this meant when I first started this course. And people use the word ‘contextualising’ aaaall the time at uni (no exaggeration). I think it’s one of those words that means a lot and does a good job in getting a point across but is sometimes used to fill gaps in explaining an artist’s thoughts on their own work and where it fits. So it’s handy and vague enough to be used all over the place.

My understanding (now that I’ve also discussed it with Johnathan) is that it’s about looking at what’s going on in the world or the circle of work around you and seeing where you or your work belongs. This could be from any perspective really and can sometimes be very subjective but where (like in this essay) you have to address it for formal writing you need to be quite objective. You also need to acknowledge that there might not be an allocated slot waiting for you to park yourself and your work in. Or there might be one but it’s over crowded. Or what if you have to make your own patch of grass in the field? Whatever you do you have to back it up. And so I need to think of a relevant subject to discuss.

I could do something that looks at contemporary middle eastern art – especially as I did the lengthy posts about the Unveiled exhibition at the Saatchi Gallery. But I think I’ve drained myself on that subject. There really are so many possibilities and subjects I could cover so I’m going to give myself a few days to really think about it.

Our mini deadline is for June 22nd by which time we must provide our tutors with a title, abstract and bibliography. I better get my skates on.

So overall we had a good discussion about project ideas that I can experiment with and subjects I could consider for my writing. Below I have typed out the actual notes I took during the tutorial:

Maybe write a reflective summary on each point discussed previously in for example the Saatchi post.

Or for example after completing one task think about it at a deeper level – How did I feel about this? Did it fulfill it’s goal? Was I frustrated? If yes then why? If not then why not? Does it mean enough to me?

Refer to content on wiki about reflective blog writing

Possibilities of using Arabic calligraphy in my work – why not experiment?

Digital surface has no limit in terms of scale so could zoom in on detailed work

Using existing ideas of fragmented parts making a whole, how about words within words within words so that as you keep zooming they appear just as the first word did to start with. Would this then be only calligraphic text or normal arabic writing? Both are very different – maybe they could be combined?

Is there software that can produce an outline and then fill the shape of the word with other words provided? Maybe it could be created?

The word Allah (swt) repeated within itself has strong metaphorical message.

If it doesn’t work then so be it. You’ll learn something from the experience anyway. Then the reflective questions come into play and you go through the process of fully understanding how that experimentation made a difference to the project as a whole.

It could be interesting to look back at the Saatchi post now and ask myself about what I wrote and why I wrote with focus on certain aspects.

Essay abstract (roughly 200-300 words), title and bibliography are due 22nd June!!

Contextualising – understanding where you stand. Could be saying ‘this is one angle and this is another’

It is important to be objective and know what’s going on around you even if you don’t like it.